

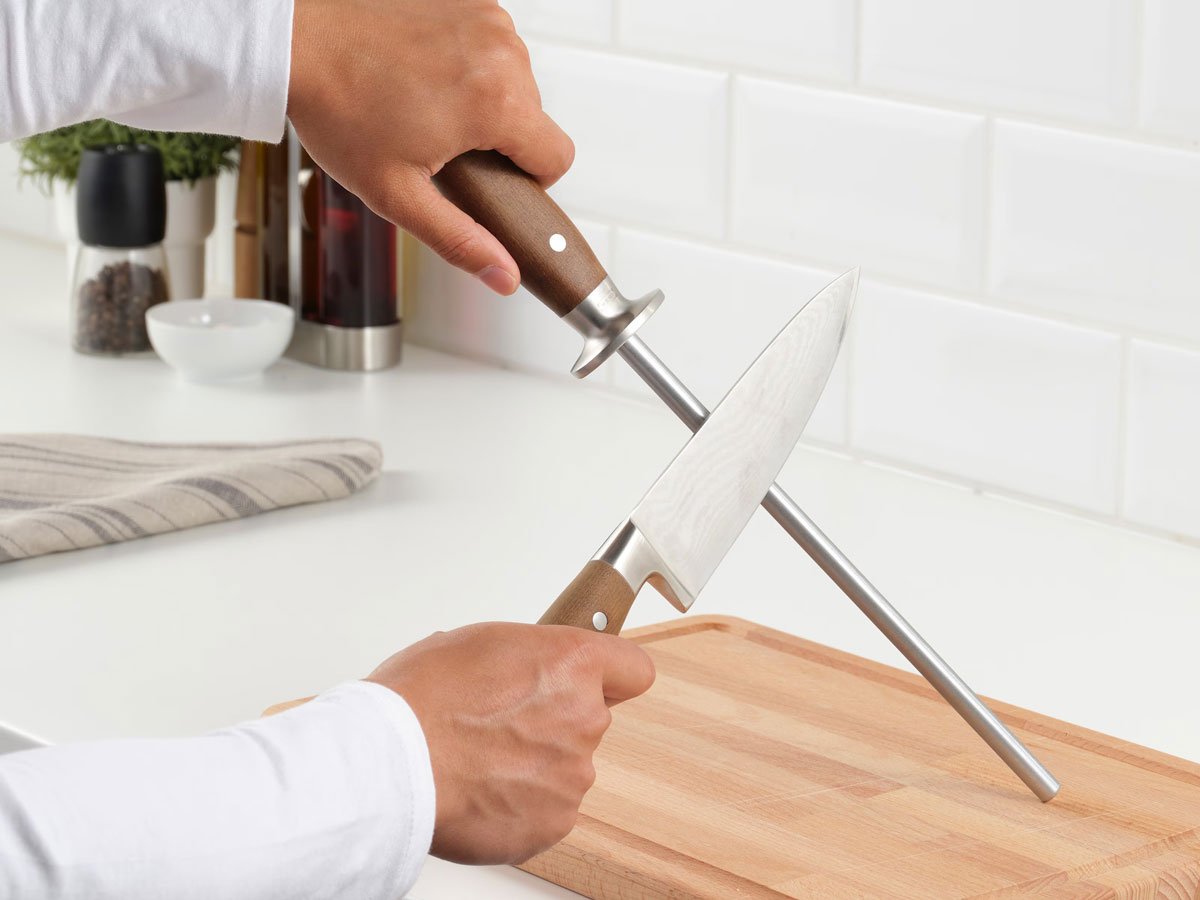
A kitchen knife rod is best used to realign a slightly rolled edge, not to rebuild a truly dull knife. Use a honing steel or ceramic rod at about 15 to 20 degrees per side, keep the pressure light, and make slow heel-to-tip strokes until the blade cuts cleanly again.
The common mistake is treating the rod like a file. Fast scraping looks impressive, but it usually rounds the edge, scares the cook next to you, and leaves the knife only briefly better. A rod works when the angle is steady, the contact is gentle, and the whole edge gets the same treatment from heel to tip.
First, Know Whether the Rod Is Sharpening or Honing
Most kitchen rods hone rather than sharpen: they push a bent edge back into line. Ceramic and diamond rods can remove metal, but a smooth steel mainly maintains an edge that already exists.
A knife edge is thin enough that normal chopping can make it lean microscopically to one side. A honing rod straightens that lean. A sharpening stone, diamond plate, or electric sharpener removes metal to create a new apex. That distinction matters because no amount of steeling will fix a knife that has lost its edge geometry.
| Rod type | What it does best | When to use it | Main caution |
|---|---|---|---|
| Smooth steel | Realigns a soft or medium-hard edge | Before prep, after light board work | Will not sharpen a very dull knife |
| Fine grooved steel | Lightly bites into the edge while honing | Western chef’s knives and utility knives | Heavy pressure can chew up the edge |
| Ceramic rod | Hones and lightly abrades | Touching up harder Japanese-style knives | Can chip if dropped or knocked against the counter |
| Diamond rod | Removes metal faster | Quick repair on a tired working edge | Easy to overdo on thin kitchen knives |
America’s Test Kitchen explains honing as maintenance rather than full sharpening, and that framing is the right one for most home kitchens. If the knife slides on tomato skin after a few careful passes, the rod is no longer the right tool.
Set Up the Rod So the Knife Cannot Slip Toward You
The safest beginner setup is vertical: tip of the rod on a folded towel, handle at the top, knife moving downward and away from your fingers. It is slower than the dramatic midair method, but much easier to control.
Put a damp towel or cutting board mat under the rod tip so it does not skate across the counter. Hold the handle firmly with your non-cutting hand. Keep the rod nearly vertical, with the tip anchored. Your sharpening hand should move the knife, while the hand holding the rod stays quiet.
For a right-handed cook, the first stroke usually starts with the heel of the knife near the top of the rod on the left side. Pull the blade down and toward yourself just enough for the edge to travel from heel to tip. Then switch to the other side of the rod and repeat with the opposite face of the blade. Left-handed cooks can mirror the motion; the rule is the same: the sharp edge should never travel toward the hand holding the rod.
Find the Right Angle Before the First Stroke
Most Western kitchen knives respond well around 20 degrees per side, while many Japanese-style knives prefer closer to 15 degrees. Matching the existing bevel matters more than chasing a perfect number.
A quick way to estimate 20 degrees is to hold the knife at 90 degrees to the rod, cut that in half to 45 degrees, then cut it in half again to about 22 degrees. Drop slightly lower for a thinner blade. If your knife has a wide, visible bevel, use that bevel as the visual guide.
There is a small tactile cue here: when the angle is close, the edge feels as if it is resting on the rod instead of slipping over it. If the spine is too high, the stroke feels scratchy and aggressive. If the spine is too low, the shoulder of the blade rubs and the edge gets little benefit.
Step-by-Step: How to Sharpen Kitchen Knives With Rod Control
Use alternating, light strokes from heel to tip. Six to ten strokes per side is usually enough for a normal touch-up; more pressure is not a shortcut.
- Anchor the rod. Place the rod tip on a towel or board, with the handle upright and stable.
- Set the angle. Hold the knife about 15 to 20 degrees from the rod, depending on the blade style.
- Start at the heel. Put the part of the edge nearest the handle against the top section of the rod.
- Draw down to the tip. Pull the knife down the rod while sliding toward the tip in one smooth motion.
- Switch sides. Move to the other side of the rod and repeat the same heel-to-tip stroke.
- Count evenly. Do 6 to 10 alternating strokes total for a maintenance pass, or 6 to 10 per side if the edge is noticeably tired.
- Lighten the last strokes. Finish with two or three very gentle alternating passes to reduce any tiny burr or wire edge.
- Wipe the blade. Use a damp cloth, then dry the knife before testing or cutting food.
The motion should be quiet. A harsh rasping sound usually means the pressure is too high, the angle is too steep, or the rod is too coarse for the job. Think of the final strokes as polishing the edge back into order, not grinding it into submission.
“It’s not stopping that is 90%, but deburring. When you start out, you inevitably end up doing most of the deburring on a strop. As you improve you’ll deburr on stones.”
– r/sharpening, February 2026
That Reddit comment is aimed at stone sharpening, but the lesson carries over: the final edge is often decided by burr control and light finishing pressure. A rod can leave a knife feeling worse if every pass is heavy.
Use Less Pressure Than You Think

The right pressure is roughly the weight of the knife plus a little guidance from your hand. Pressing hard turns a maintenance pass into uneven abrasion and can make the edge feel toothy in the wrong way.
If you are using a smooth steel, pressure should be almost feather-light. With ceramic or diamond rods, go lighter still because the surface actually removes metal. A heavy hand on a diamond rod can change the bevel faster than a beginner expects.
One practical check: after a few strokes, look at the rod. If you see dark metal streaks on ceramic, that is normal. If the streaks appear instantly and heavily, you are probably pressing too hard. Clean ceramic rods with a damp melamine sponge or a non-abrasive cleanser when they load up with swarf.
Test the Edge Without Abusing the Knife
A good rod session should make the knife bite cleanly into food with less force. Test on paper, tomato skin, or an onion, but do not keep sawing at hard materials to prove a point.
- Paper test: Hold printer paper loosely and slice from heel to tip. A maintained edge should cut without tearing badly.
- Tomato test: The edge should catch the skin with little pressure. If it skids, it needs real sharpening.
- Onion test: A sharp chef’s knife should start thin slices without crushing the outer layer.
- Visual check: Under bright light, flat shiny spots on the edge often mean dull areas remain.
Do not test by dragging your thumb along the edge. If you use your thumb at all, touch across the edge very lightly and only if you already know safe knife handling. Food tests tell the truth with less risk.
When the Rod Is Not Enough
A rod cannot fix chips, a rounded apex, or a knife that has been dull for months. If 10 careful passes do not restore the bite, move to a whetstone, guided sharpener, or professional sharpening.
This is where many home cooks get stuck. The knife improves for three carrots, then feels dull again because the bevel itself is worn. A rod keeps a sharp knife sharp longer. It does not replace the occasional reset.
| What you notice | Likely problem | Better fix |
|---|---|---|
| Knife improves briefly, then fades | Edge is rounded or fatigued | Sharpen on stone or guided sharpener |
| Visible chips or flat spots | Damaged edge | Coarser sharpening, then refinement |
| Knife pulls to one side | Uneven bevel or uneven rod strokes | Sharpen evenly and check angle consistency |
| Knife feels rough but not sharp | Burr or ragged edge remains | Finish with lighter alternating strokes or strop |
For busy home kitchens, honing before heavy prep and sharpening every few months is a reasonable rhythm. Professional cooks may hone daily and sharpen more often. KitchenKnifeGuru’s honing guidance also stresses schedule and ergonomics, which matters because the best rod technique is the one you can repeat safely. The cutting board matters too: glass, stone, and ceramic boards punish edges quickly. Wood and plastic are kinder.
Common Rod Mistakes That Make Knives Worse
Most rod problems come from speed, steep angles, and too many strokes. The fix is boring in the best way: slow down, hold the angle, and stop once the knife improves.
Using the Rod Like a Stage Trick
The fast midair method looks professional because butchers and line cooks have muscle memory. At home, it often means uneven contact and a wandering angle. The vertical towel method is more dependable while you learn.
Treating Every Rod the Same
A smooth steel is forgiving. A ceramic rod is more abrasive. A diamond rod is more aggressive again. If you switch rods and keep the same pressure, the edge can change quickly.
Working Only the Middle of the Blade
Many people touch the sweet spot of the blade and miss the heel and tip. Start deliberately at the heel and finish deliberately at the tip, even if the stroke has to be slower.
Using a Dirty or Short Rod
The rod should be at least as long as the knife blade if possible. A short rod makes the tip awkward. A loaded ceramic rod loses bite and encourages extra pressure.
FAQ
Can you actually sharpen a kitchen knife with a rod?
You can sharpen lightly with a ceramic or diamond rod, but a traditional steel rod mostly hones the knife by realigning the edge. For a very dull knife, use a whetstone, pull-through sharpener, guided system, or professional sharpening service.
What angle should I use with a honing rod?
Use about 20 degrees per side for many Western kitchen knives and about 15 degrees for many thinner Japanese-style knives. The best angle is the one that matches the existing bevel without scraping the shoulder of the blade.
How many times should you run a knife on a rod?
Start with 6 to 10 alternating strokes total for a light touch-up. If the knife still does not bite into paper or tomato skin, do not keep adding strokes endlessly; the blade likely needs real sharpening.
Should I use a ceramic rod or steel rod?
Use a steel rod for routine honing on softer Western knives and a ceramic rod when you want a little more bite or have harder steel. Use diamond rods carefully because they remove metal faster.
Do you hone before or after using a knife?
Hone before prep when the knife feels slightly tired, then wipe the blade before cutting food. After prep, wash and dry the knife. If you used the knife heavily, a quick hone before the next session is usually enough.
The Practical Rule
For a home cook, how to sharpen kitchen knives with rod control comes down to restraint. Use the rod as a maintenance tool, not a rescue tool. Keep the angle steady, use light pressure, alternate sides, and stop when the knife cuts cleanly. If the rod has to fight the blade, the blade is asking for a stone.